How to Install a Chain-Link Fence
Whether you want to keep things in or keep things out, a chain-link fence is just the thing. Installing a chain-link fence is a great do-it-yourself project. All you need is a little direction.
Tools & Materials
- Chalk Line
- Stakes
- Measuring Tape
- Posthole Digger
- Wheelbarrow
- Shovel
- Hoe
- Carpenter’s Level
- 1/2-in. and 9/16-in. Wrench
- Hacksaw
- Fence Stretcher
- Pliers
- Tension Wire Clip
- Fence Fabric, Posts and Other Materials

Before beginning your fence installation it’s important to check:
That fence footings don’t exceed legally established property lines. If you’re uncertain, refer to a real estate agent’s line plot, or consult a professional surveyor.
Local codes for specifications regarding frontage locations, allowable fence heights, etc. A permit may be required.
If you reside in at the City of Edmonton bylaw jurisdiction, we have included a city supplied guideline that outlines, where and when permits are required, heights and considerations you should follow when building a fence and more.
Preparing Fence Layout
Use the following steps to lay out your chain-link fence.
Step 1
Locate your property’s boundary lines. It’s recommended that all posts be set approximately 4 inches inside the property line so that concrete footings don’t encroach onto any adjoining property.
Step 2
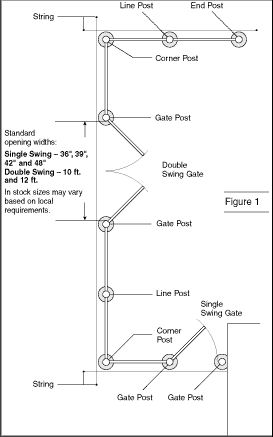
Measure the overall length of your planned fence to determine how many feet of chain-link fabric and top rail will be required (Fig. 1).
Step 3
Mark the location of each terminal post (corner, end and gateposts are called terminal posts) with a stake. When determining the positions of gateposts, remember that clearance for hinges, latches, etc., is included in the listed opening width of the gate. Therefore, if you ordered a gate for a 36-inch opening, the post spacing should be exactly
36 inches, inside post face to inside post face.
Setting Terminal Posts
The steps below will help you to set the terminal posts.
Step 1
Dig the terminal postholes approximately 8 inches in diameter and 30 inches deep, with sloping sides (Fig. 2). The exact diameter and depth will be determined by local weather and soil conditions.
Step 2
With crayon or chalk, mark the ground line on the posts. The height, above level ground, of the terminal posts will equal the height of the fence fabric plus 2 inches.
Step 3
Center the terminal posts in the holes. Make sure the posts are plumb and set at the correct height. (Crayon mark should be at ground level.)Surround the posts with concrete in a continuous pour. Trowel finish around the posts and slope downward to direct water away.
Locating and Setting Line Posts
Use the steps below to locate and set the line posts.
Step 1
When the terminal post footings have hardened enough to stabilize the posts, stretch a string line taut between the terminal posts. The string should be positioned on the outside face of the posts 4 inches below the top (Fig. 3). The height, above level ground, of line posts will equal the height of the fabric minus 2 inches.
Step 2
Measure the distance between the terminal posts, and refer to the post spacing chart to determine the distance between the line posts. Dig the line postholes 6 inches wide and 18 inches to 24 inches deep, with sloping sides (Fig. 4). Center the line posts in the holes. Make sure the postsare plumb, aligned with the centers of the terminal posts and set at the correct height. Surround the posts with concrete in a continuous pour.Trowel finish around the posts and slope downward to direct water away.

Adding Fittings to Terminal Posts
Add the fittings to the terminal posts with the following instructions.
Step 1
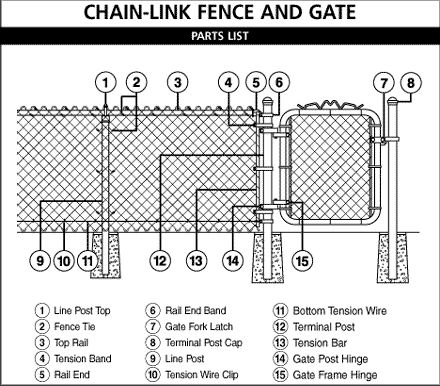
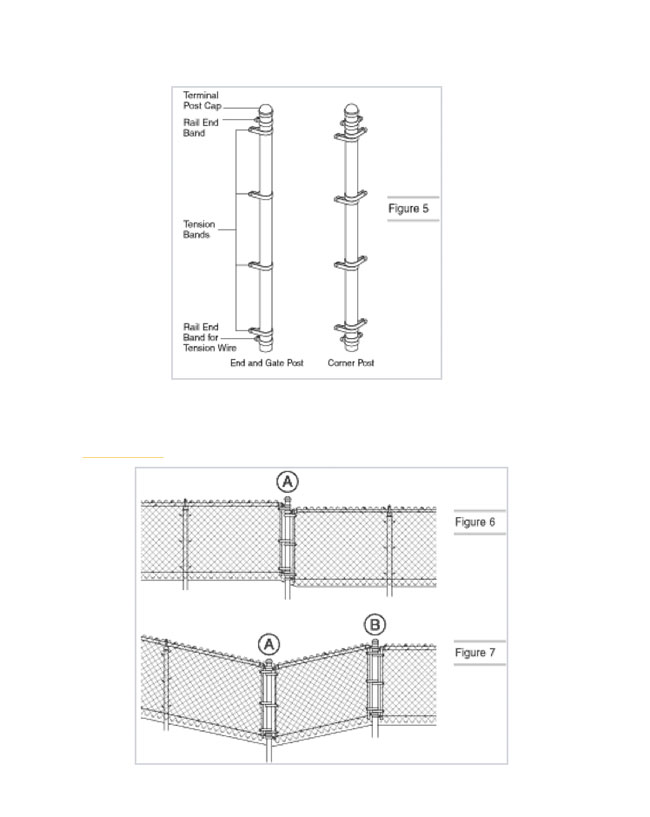
After the concrete footings have been allowed to sufficiently harden, slip the rail end bands and tension bands onto the terminal posts. (Refer to the parts list for the description and quantity of fittings that are required for various post types and heights.) The long, flat surface of the tension band should face toward the outside of the fence (Fig. 5).
NOTE: Don’t spread or distort the fittings.
Step 2
Apply all terminal post caps.
Terraced ground corner post assembly is used at point A to allow the fabric to follow the terraced contour of the ground (Fig. 6).
Very uneven ground corner post assembly is used at points A and B when the ground rises or drops more than 15 inches per 100 linear feet (Fig. 7).
Installing Top Rails
Install the top rails to your posts with these instructions.
Step 1
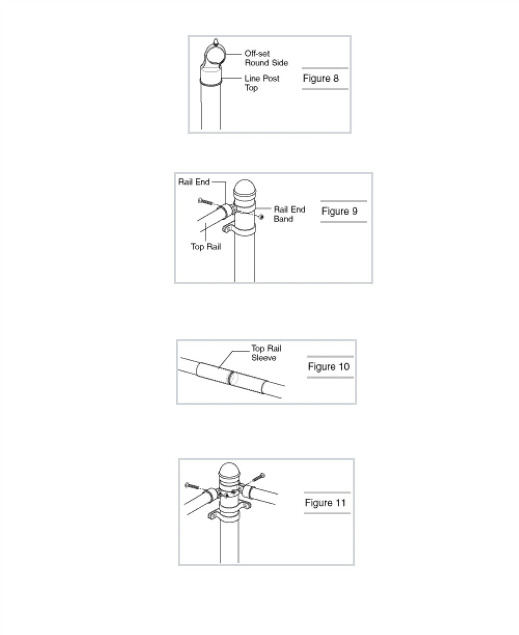
Place the line post top on the top of each line post. The offset round side should be toward the outside of the fence (Fig. 8).
Step 2
Insert one length of the top rail through the line post top closest to a terminal post. Slip the rail end onto the end of the top rail and attach it to a terminal post by using a rail end band. Secure by using a 5/16-inch-by-1-1/4-inch carriage bolt with the head to the outside of the fence (Fig. 9).
Step 3
Continue by forcing the lengths of swedge end top rail together through the line post tops. (If the swedge end top rail isn’t used, join the lengths together with the top rail sleeves.) (Fig. 10)
Step 4
Upon reaching the next terminal post, measure carefully, and cut the top rail to fit tightly between the last length of the top rail and the rail end. Fasten rail end to rail end band on the terminal post. Secure in place with a 5/16-inch-by-1-1/4-inch carriage bolt (Fig. 11).
Installing Tension Wire (Optional)
Wrap the tension wire once around the bottom-rail end-band carriage bolt. Using pliers, twist several times to secure (Fig. 12). Tension wire should run along the same side of the posts as the fabric. Apply tension wire clips no more than 24 inches apart or as needed for securing the wire to the chain-link fabric.
Hanging Fence Fabric
Hang fence fabric and remove the excess by following these steps.
Step 1
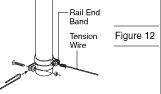
Starting at a terminal post, unroll the chain-link fabric on the ground along the outside of the fence line to the next terminal post. Slide a tension bar through the first row of chain-link diamonds. Fasten evenly spaced tension bands (already on the post) to the tension bar fabric combination using 5/16-inch-by-1-1/4-inch carriage bolts with heads to the outside of the fence (Figs. 13 and 14).
Step 2
Walk along the fabric and stand it up against the fence frame, taking out the slack as you go. Loosely attach the fabric to the top rail with a few fence ties to hold it in place. Separate enough fabric from the roll to span the opening between the terminal posts.
To remove excess fabric:
Remove the excess fabric with pliers by opening the top and bottom loops (knuckles) of a single strand of wire at the desired point of separation. Unwind the strand up through the links until the fabric comes apart (Figs. 15 and 16).
To splice sections of fabric:
Splice sections of the chain-link fabric together using a single strand of wire, removed from the end of the fabric. Join the two sections by winding the loose strand down, corkscrew style, through the end links. Join and tighten the knuckles at the top and the bottom to secure.
NOTE: Before sections can be spliced, a second strand may have to be removed to provide a proper mesh.
Stretching Fence Fabric
Stretch the fence fabric to make it fit.
Step 1
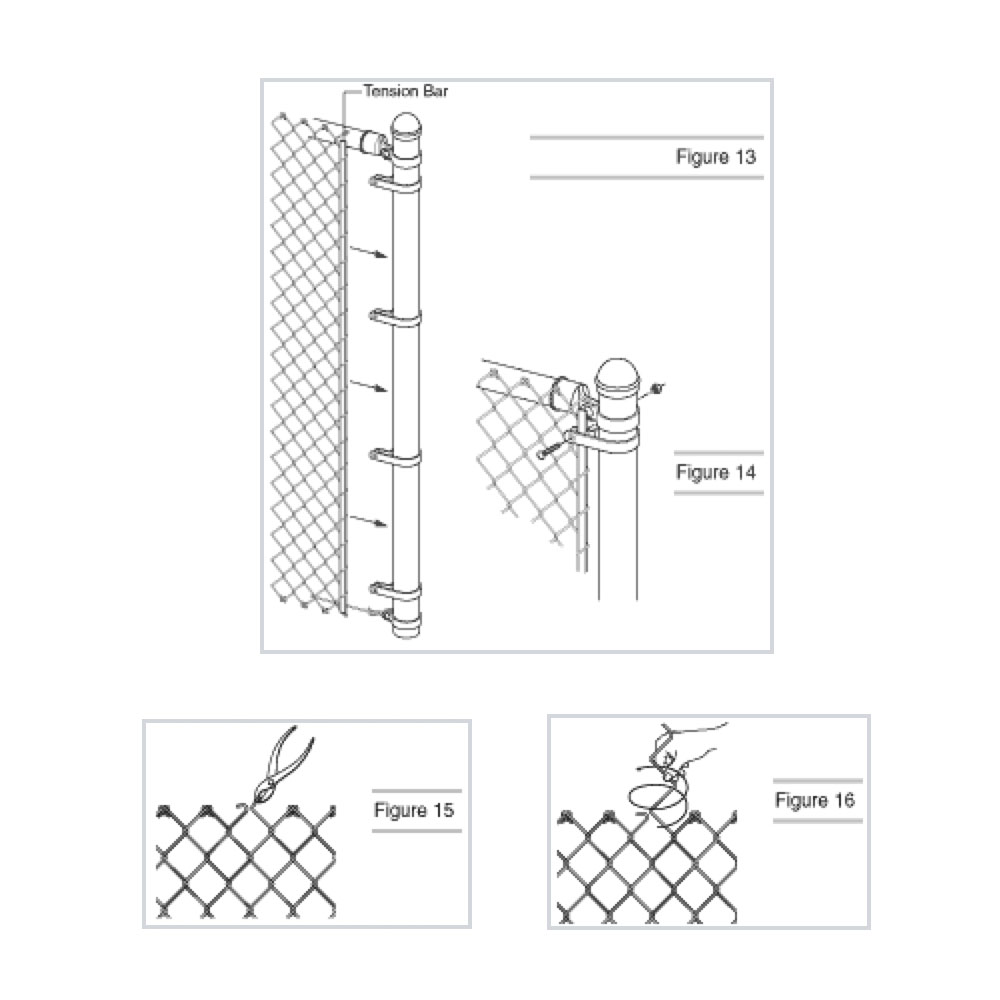
Temporarily insert a tension bar about 3 feet inside the unattached end of fabric. Securely fasten one end of the fence stretcher to the tension bar and the other end to the terminal post (Fig. 17). Stretch the fabric. The correct fabric tension should allow a slight amount of give when squeezed by hand. Remove the temporary tension bar.
Step 2
Adjust the fabric to the exact length by adding or removing wire as shown in figures 15 and 16. Insert a tension bar at the end of the fabric and connect it to the tension bands on the terminal post.
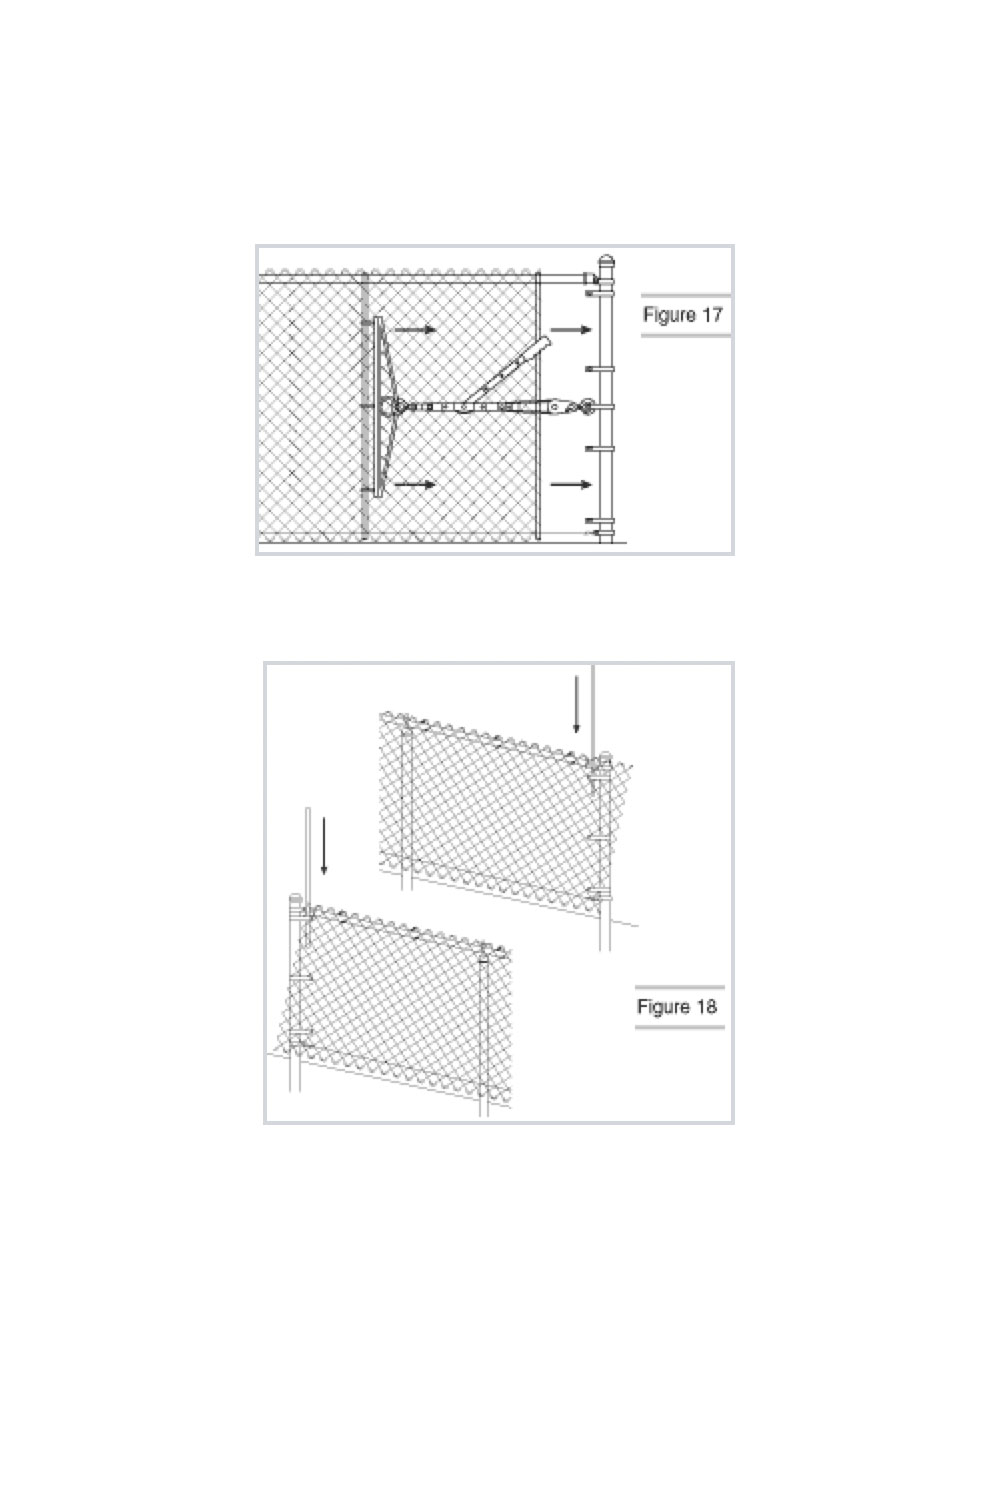
If the top of the chain-link fabric doesn’t create a right angle to the terminal post, the fabric must be cut on a bias so that the tension bar can slide into the fabric at the proper angle. Pull the chain-link fabric until the top or the bottom, whichever is shortest, reaches the terminal post. The other corner of the fabric will extend past the terminal post. Insert the tension bar at an angle through the fabric parallel to the terminal post (Fig. 18).
Remove the excess wire by cutting the strands that form the diamond at the tension bar, leaving them long enough to bend over the bar. Don’t cut every wire. The number of wires cut depends on the degree of slope and the height of the fence.
Installing Fence Ties
Fasten the fabric securely with fence ties spaced approximately 24 inches apart along the top rail and 12 inches apart on each line post (Fig 19). Finally, securely tighten the nuts on all rail end bands and tension bands.
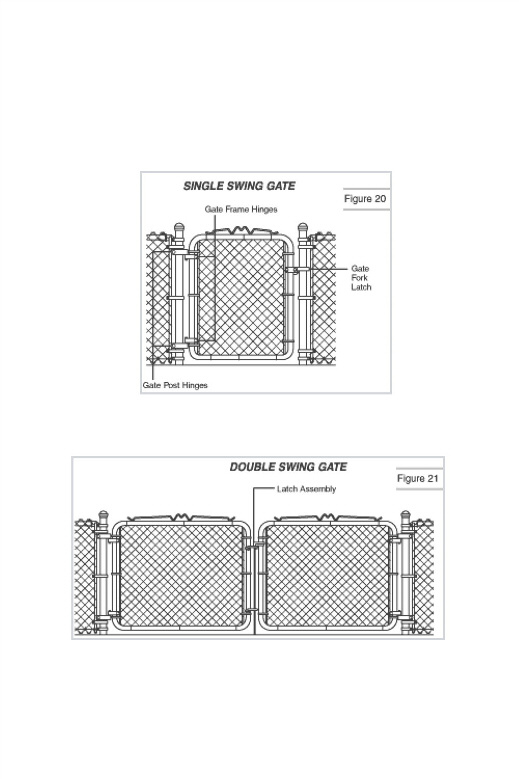
Hanging the Gate
A similar installation procedure is used on both single-swing and double-swing gates (Figs. 20 and 21).
Step 1
Apply gatepost hinges to the gatepost approximately 8 inches from the top and the bottom of the gatepost with the top-hinge pin pointing down and the bottom-hinge pin pointing up. This will prevent the gate from being removed or from dropping off. Tighten all bolts securely.
Apply gate frame hinges to the gate frame. Loosely fasten the bolts so they can be easily adjusted on the gate frame. Hang the gate(s) in place so that the bottom of the gate has approximately 2 inches of ground clearance. Tighten the bolts on the bottom frame hinge first, and then adjust and tighten the bolts securely at the top.
Step 2
Position the gate fork latch at a convenient height. Tighten all bolts securely.
NOTE: Adjust the latch assembly on the double-swing gate to the correct height and tighten all bolts securely (Fig. 21).